Chapter 3-7: Output Processes |
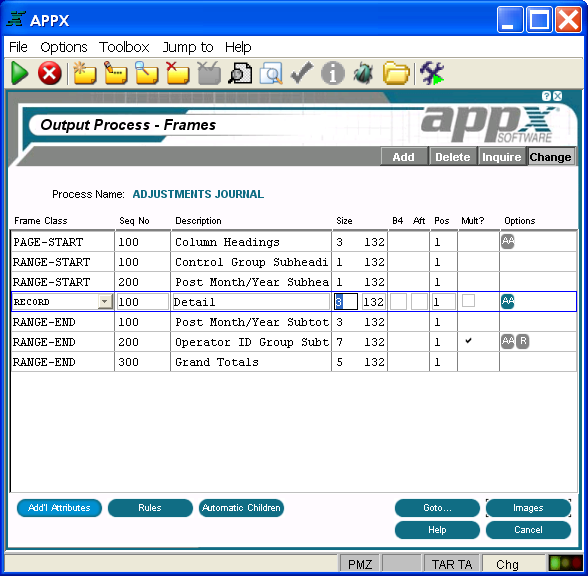
Output Frame Specifications When you select the frames option (or press return) on the Output Processes screen, after completing specifications for an output process, the Output Process Frames screen is displayed as shown below. Output frame specifications define attributes that govern both the visual presentation of a frame and the way it executes.
Output Process Frames Screen The Output Process Frames screen contains the following fields: Frame Class defines the type of frame with which you are working. Valid options are: Report-Start frames print once at the beginning of a report. To print on a separate page, the designer should set New Page After? in Output Frame Additional Attributes for the last Report-Start frame. Page-Start frames print once at the beginning of each page of a report. They are primarily used for page headings and column headings. Standard images for both of these are optionally available. See Standard Column Heading Image Generation for more information on column headings. Range-Start frames print immediately before the first record for which the value in a specific sort field (the range field) changes. They are primarily used for subheadings and lower-level column headings. Standard images for both of these are optionally available. See Standard Column Heading Image Generation for more information on column headings. Record frames manipulate and print information read from the process control file. They comprise the body of a report. Record frames can be defined to scroll. Range-End frames print immediately after the last record in a series of records that have the same value in a specific sort field (the range field). They are primarily used for subtotals, and a standard subtotal image is optionally available. Page-End frames print once at the conclusion of each page of a report. Report-End frames print once at the conclusion of a report. To print on a separate page, the designer should set New Page Before? in Output Frame Additional Attributes for the first Report-End frame. Seq No displays a sequence number that is defaulted by APPX and used to identify this output frame. The default sequence number can be overridden, but must be unique within each frame class for the process. Sequence numbers determine the order of the frames in the process structure. The first frame that is defined in add mode is assigned sequence number 100, and additional frames are assigned a number equal to the highest existing sequence number, plus 100. Description identifies this output frame. The description is for documentation purposes only. Size fields designate the number of rows and columns that comprise the frame. The row default is 1, and the column default corresponds to the report width entered for the output process, if any. B4 indicates the number of blank lines to print before executing this frame. The default is 0. In some cases, such as optional or repeating frames, it may be more appropriate to specify lines to skip at the image level. See the Scrolling or Non-Scrolling Image Additional Attributes options as applicable. Aft indicates the number of blank lines to print subsequent to executing this frame. The default is 0. In some cases, such as optional or repeating frames, it may be more appropriate to specify lines to skip at the image level. See the Scrolling or Non-Scrolling Image Additional Attributes options as applicable. Pos designates the placement of the frame relative to the far left-side position of the report. See Frame/Image Positioning for more information.
Mult? A 'yes'
Options are indicators that are present whenever the options they denote have been defined. Options applicable to this screen are Buttons are provided at the bottom of each Output Process Frames screen for accessing the following options: Additional Attributes - See the Output Frame Additional Attributes Option for details. Rules - See the Output Frame Rules Option for details. Automatic Children - See the Output Frame Automatic Children Option for details. Goto... - Allows you to identify and retrieve another record by optionally entering a full or partial key. Images - See Output Image Specifications for details. This is the default option. Help - Allows you to view online help text for a selected item. Close or Cancel - In Inquire mode, Close allows you to end the current process. Otherwise, Cancel allows you to end the current process without saving changes, if any, to the current record. In addition, the menu bar provides the following pulldown menus: Toolbox - See the Output Frame Toolbox Pulldown Menu for details. Jump to - Same as the Process Jump to Pulldown Menu. |
Application Design Manual "Powered by Appx Software"341 ©2006 By APPX Software, Inc. All Rights Reserved |
 in this field indicates that this output frame contains more than one image. If 'no'
  is selected, you will be unable to add more than one entry at the image level. The default is 'no' but can be toggled to 'yes' by clicking the checkbox.